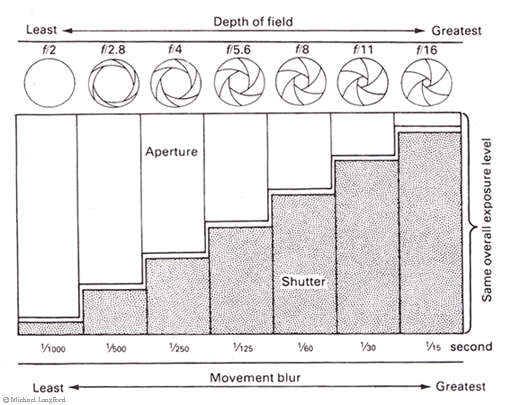
We were lighting in the studio today with the Wafer Lights. It is quite similar set up to lighting off studio. First you have one light, and you use the flash of it to light meter against the subject. the light meter has to read the same as the aperture number of the the camera- if the number is too low, turn the power up and vis-versa. This process is repeated with a fill light, and then with both fill light and main, to check it isn't over-exposed. If it is too over exposed, you can change the shutter speed, or turn aperture up a stop. here is a useful aperture/shutter-speed chart:
It is important to realize that when lighting, you have to decide what the aperture is, based on the depth of field, and then set shutterspeed to this. We wanted the aperture to be 5.6, and then had to make sure the light meter of the flash matched this much. We had transmitters to do this on the camera and light meter.
After this, we realized that the white infinity-curve background was grey instead of white.
This is because the camera's exposure meter reads everything at a mid-grey, which it takes as a middle between the most exposed and least exposed areas of the photograph. You can change the tone of grey by light metering in different areas. Ansel Adams devolved the "Zone System", which is useful to work out how to expose properly. This is what Adams suggested what each zone meant.
Ansel Adams' description of zones (geared towards black and white printing)
Low values
Zone 0 | Complete lack of density in the negative image, other than film base density plus fog. Total black in the print. We will omit zone 0 from the remainder of this tutorial; zone 1 will be considered pure black. Omitting zone 0 makes little practical difference. |
| Zone 1 | Effective threshold. First step above complete black in the print. Slight tonality, but no texture. |
| Zone 2 | First suggestion of texture. Deep tonalities, representing the darkest part of the image in which some detail is required. |
| Zone 3 | Average dark materials. Low values showing adequate texture. |
Middle values
Zone 4 | Average dark foliage. Dark stone. Landscape shadow. Recommended shadow value for portraits in sunlight. |
| Zone 5 | Clear north sky (panchromatic rendering). Dark skin. Gray stone. Average weathered wood. Middle gray (18% reflectance). |
| Zone 6 | Average Caucasian skin value. Light stone. Shadows in snow in sunlit snowscapes. |
High values
Zone 7 | Very light skin. Light gray objects. Average snow with acute side lighting. |
| Zone 8 | Whites with textures and delicate values (not blank whites). Snow in full shade. Highlights on Caucasian skin. |
| Zone 9 | Glaring white surfaces. Snow in flat sunlight. White without texture. (The only subjects higher than Zone 9 would be light sources; they would be rendered as the maximum white value of the paper surface.) |
|
Though this is more of a problem for those who shoot on film cameras, this is important when shooting on a white background. To make it look white, you take a reflected reading off the white wall. If the wall is the same fstop as the aperture you are shooting at, (which it should be) you can increase the aperture of the lights or camera by 2 stops and the wall should start coming out white. This is similar in outside photography- Select an area of the scene, meter it, then adjust the exposure by the difference between the zone you want in the final image and zone 5 (middle gray).

No comments:
Post a Comment